A. You are able to add images as options available to members in the background image library. The background image library is used in the page wizard in the first step as well as in other places such as when editing the background in the CSS editor when editing a page.
Where to Add/Remove Images
The images available to members are based off the images that exist in the folder:
/uploads/wizardbackgroundsYou can add/remove images from the background image library by adding/removing jpg images from the
/uploads/wizardbackgrounds folder or any folder inside of that folder through the
file manager.
Images added need to be .jpg format.
Grouping Images Into Folders
You can have the images in the background image library grouped into folders. To do this create a folder in the
/uploads/wizardbackgrounds folder. For example, if you create a folder called
clouds and then you upload images to this folder (/uploads/wizardbackgrounds/
clouds) then a folder will appear to members called clouds and the images you added to the clouds folder will appear to the members when they click on the cloud folder in the image library.
Image Thumbnails
It is not required but it is advised to create a thumbnail for the image. Thumbnails should have the same filename as the main image but with
-small appended to the end of the filename. For example, if the main image is backimage.jpg then the thumbnail should be called backimage
-small.jpg. It is recommended that the thumbnail image size is
288px x 162px.

A. There are several ways that members can set their 3rd party autoresponder depending on how your software is setup and if they are doing setting it for their entire account or just for a specific page.
Enabling 3rd Party Autoresponders
In order for a member to be able to setup a 3rd party autoresponder the feature needs to be turned on under advanced features. By default this is turned on when a system is first installed. This setting is found in the Email tab and is titled "Allow 3rd Party Autoresponder".
Entire Account vs Specific Page
Specific Page - When settting it up for a specific page it is only setup for that specific page. This setting overrides anything that is setup for the entire account.
Entire Account - When setting it for the entire account every page that does not have a 3rd party autoresponder setup will use this 3rd party autoresponder that is set for the entire account.
Entire Account How To
There are 2 places where this option may exist. Depending on how your software is configured it might be in both locations or it might be in one or the other location. In both of these pages the 3rd party autoresponder by default appears in the same location on the right side.
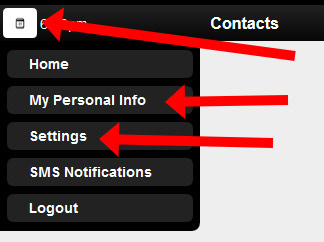
Settings - On the settings page (/admin/settings) there maybe an option to edit the 3rd party autoresponder.
Profile - On the profile page (/admin/profile) there maybe an option to edit the 3rd party autoresponder.
Specific Page How To
If a member is able to edit a capture page then there also is an option while editing the page to setup a specific 3rd party autoresponder for that page. There are 2 different places that this option might exist depending on if the form of the page is editable or not.
 Non Editable Form
 - Any older page installed in the software before version 4.93 will not have an editable form. Also, by default, any custom pages that you provide for us to install will not have an editable form.
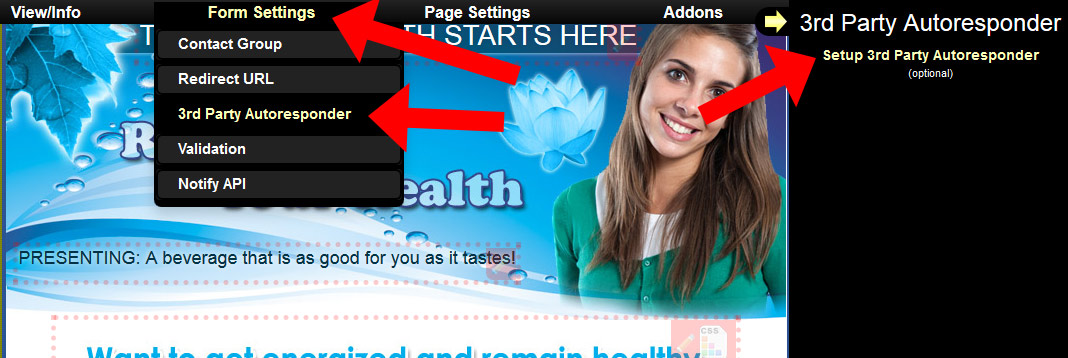
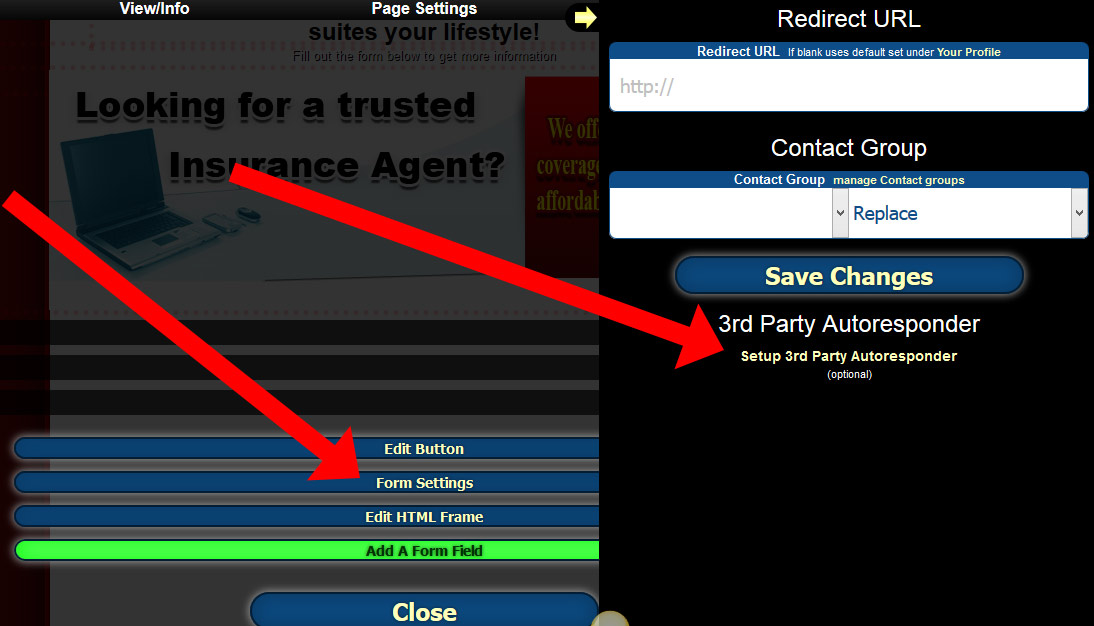
 Editable Form
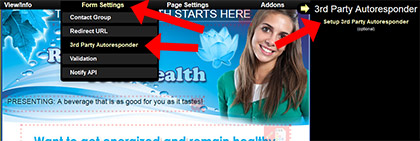
 - Newer pages created using the page wizard have an editable form. Also, our templates now have editable forms so newly purchased templates will have this feature. To edit the 3rd party autoresponder either double click on the form or click on the edit icon that appears when you hover over the form. After doing this buttons will appear. Click on the button titled "Form Settings". Then a section on the right side will appear which at the bottom of the section has the option for setting the 3rd part autoresponder.